Load Balancer with HAProxy SSL Termination
The Load Balancer is like the sister of clustering. If you make Ant Media Server instances run in cluster mode, then a load balancer will be required to balance the load.
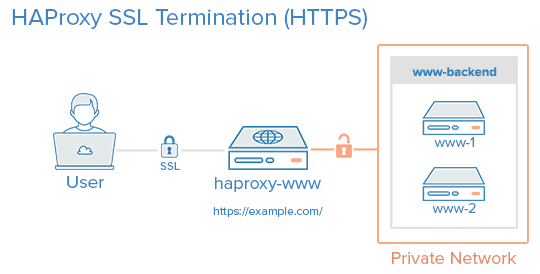
In this documentation, you will learn how to install HAProxy Load Balancer with SSL termination.

The configuration below balances RTMP, HLS, HTTP/HTTPS and WebSocket(WS/WSS) connections to use for RTMP, HLS and WebRTC streaming.
HAProxy Installation
Run the commands below to install HAProxy
sudo apt-get install software-properties-common -y
sudo add-apt-repository ppa:vbernat/haproxy-2.0
sudo apt-get update
sudo apt-get install haproxy=2.0.\*
SSL Certificate Installation
Install the Certbot
sudo apt-get update
sudo apt-get install software-properties-common
sudo add-apt-repository ppa:certbot/certbot
sudo apt-get update
sudo apt-get install certbot
Get the Certificate
Please change example.com with your domain name
sudo certbot certonly --standalone -d example.com -d www.example.com
Combine the PEM files
Combine fullchain.pem and privkey.pem and save it to /etc/haproxy/certs folder
sudo mkdir -p /etc/haproxy/certs
DOMAIN='example.com'
sudo -E bash -c 'cat /etc/letsencrypt/live/$DOMAIN/fullchain.pem /etc/letsencrypt/live/$DOMAIN/privkey.pem >` /etc/haproxy/certs/$DOMAIN.pem'
sudo chmod -R go-rwx /etc/haproxy/certs
Now there is a valid pem file ready under /etc/haproxy/certs ready to be used by HAProxy.
Configuring HAProxy
Backup the default configuration file
mv /etc/haproxy/haproxy.cfg{,_backup}
Create a new configuration file
nano /etc/haproxy/haproxy.cfg
Add global and default parameters to the configuration file
global
    log 127.0.0.1 local0 notice
    maxconn 2000
    user haproxy
    group haproxy
defaults
    log global
    mode http
    option forwardfor
    option http-server-close
    option httplog
    option dontlognull
    timeout connect 5000
    timeout client  5000
    timeout server  5000
    timeout tunnel  2h  #this is for websocket connections, 2 hours inactivity timeout
    timeout client-fin 5000
    errorfile 400 /etc/haproxy/errors/400.http
    errorfile 403 /etc/haproxy/errors/403.http
    errorfile 408 /etc/haproxy/errors/408.http
    errorfile 500 /etc/haproxy/errors/500.http
    errorfile 502 /etc/haproxy/errors/502.http
    errorfile 503 /etc/haproxy/errors/503.http
    errorfile 504 /etc/haproxy/errors/504.http
This configuration sets the maximum number of connections to 2000. Please change it according to your hardware and cluster size.
Add Monitoring Parameters
Please change {WRITE_YOUR_USERNAME} and {WRITE_YOUR_PASSWORD} with your own username and password. You can use these parameters while entering the monitor panel
listen stats # Define a listen section called "stats"
  bind :6080
  mode http
  stats enable  # Enable stats page
  stats hide-version  # Hide HAProxy version
  stats realm Haproxy\ Statistics  # Title text for popup window
  stats uri /haproxy_stats  # Stats URI
  stats auth {WRITE_YOUR_USERNAME}:{WRITE_YOUR_PASSWORD}  # Authentication credentials
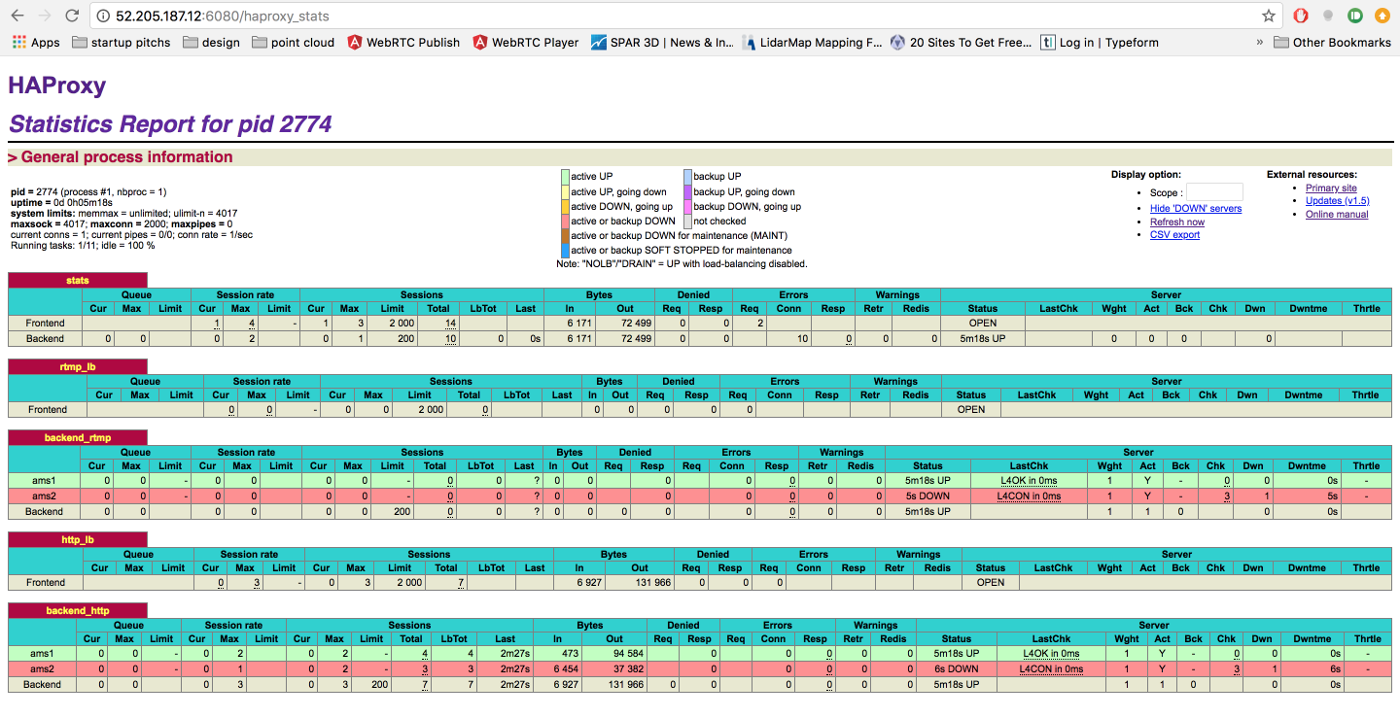
With the configuration above you can visit http://HAPROXY_LB:6080/haproxy_stats URL to monitor the HAProxy
RTMP Load Balancing
Add the following lines for RTMP Load balancing. Please change {WRITE_YOUR_FIRST_AMS_SERVER_IP_ADDRESS} and {WRITE_YOUR_SECOND_AMS_SERVER_IP_ADDRESS} with your Ant Media Server addresses.
frontend rtmp_lb
    bind *:1935
    mode tcp
    default_backend backend_rtmp

backend backend_rtmp
    mode tcp
    server ams1 {WRITE_YOUR_FIRST_AMS_SERVER_IP_ADDRESS}:1935 check  # Ant Media Server instance 1
    server ams2 {WRITE_YOUR_SECOND_AMS_SERVER_IP_ADDRESS}:1935 check  # Ant Media Server instance 2
    # you can add more instances
HTTP Load Balancing
Add following lines to add HTTP Load Balancing
frontend http_lb_origin
  bind *:80
  mode http
  reqadd X-Forwarded-Proto:\ http
  origin_backend_http

frontend http_lb_edge
  bind *:5080
  mode http
  reqadd X-Forwarded-Proto:\ http
  edge_backend_http
HTTPS Load Balancing
Add following lines to add HTTPS Load Balancing. Please change {DOMAIN_NAME} with your full qualified domain name.
frontend frontend_origin_https
  bind *:443 ssl crt  /etc/haproxy/certs/{DOMAIN_NAME}.pem
  reqadd X-Forwarded-Proto:\ https
  origin_backend_http

frontend frontend_edge_https
  bind *:5443 ssl crt /etc/haproxy/certs/{DOMAIN_NAME}.pem
  reqadd X-Forwarded-Proto:\ https
  edge_backend_http
HTTP Backend Servers
Specify the backend servers for HTTP Load Balancing. Please change {WRITE_YOUR_FIRST_AMS_SERVER_IP_ADDRESS} and {WRITE_YOUR_SECOND_AMS_SERVER_IP_ADDRESS} with your Ant Media Server addresses.
backend origin_backend_http
  leastconn
  # below line forwards http requests to https, if you do not have SSL termination, remove it
  redirect scheme https if ! { ssl_fc }
  # below line provides session stickiness
  cookie JSESSIONID prefix nocache
  server origin1 {WRITE_YOUR_FIRST_AMS_SERVER_IP_ADDRESS}:5080 check cookie origin1  #if you do not use session stickiness, remove cookie ams1
  server origin2 {WRITE_YOUR_SECOND_AMS_SERVER_IP_ADDRESS}:5080 check cookie origin2  #if you do not use session stickiness, remove cookie ams2
  # you can add more instances

backend edge_backend_http
  leastconn
  # below line forwards http requests to https, if you do not have SSL termination, remove it
  redirect scheme https if ! { ssl_fc }
  # below line provides session stickiness
  cookie JSESSIONID prefix nocache
  server edge1 {WRITE_YOUR_FIRST_AMS_SERVER_IP_ADDRESS}:5080 check cookie edge1  #if you do not use session stickiness, remove cookie ams1
  server edge2 {WRITE_YOUR_SECOND_AMS_SERVER_IP_ADDRESS}:5080 check cookie edge2  #if you do not use session stickiness, remove cookie ams2
  # you can add more instances
RTMPS Load Balancing
In order to encrypt your RTMP traffic, follow the instructions below.
If you're using let's encrypt, run the following command. Replace $DOMAIN with your own FQDN
sudo -E bash -c 'cat /etc/letsencrypt/live/$DOMAIN/fullchain.pem /etc/letsencrypt/live/$DOMAIN/privkey.pem >` /etc/haproxy/certs/$DOMAIN.pem'
If you're using a third party certificate, you can even generate the pem file as follows.
Append KEY and CRT to ssl.pem. Replace $DOMAIN with your own FQDN
cat ssl.key ssl.crt >`>` /etc/haproxy/certs/$DOMAIN.pem
Now add the following lines in haproxy.conf
listen rtmps
  mode tcp
      #Replace $DOMAIN with your own FQDN
  bind :8443 ssl crt /etc/haproxy/certs/$DOMAIN.pem # Your cert file.
  server rtmp {WRITE_YOUR_FIRST_AMS_SERVER_IP_ADDRESS}:1935
      server rtmp {WRITE_YOUR_SECOND_AMS_SERVER_IP_ADDRESS}:1935
Starting HAProxy
When everything is complete, restart the HAProxy
systemctl restart haproxy
and you can view status of the instance through http://HAPROXY_LB:6080/haproxy_stats URL
