What Is XSplit?
XSplit is a live streaming and video-mixing application developed and maintained by SplitmediaLabs and we’ll see how to use XSplit for streaming purposes. It is mostly used for capturing gameplay for live streaming or video recording purposes.
It is easy to use and provides a great canvas with a screen share option for different purposes( pc gaming, talk shows, presentations, etc.). Embedded or external cameras and audio sources can be used with XSplit. You can do RTMP stream with XSplit and watch WebRTC from Ant Media Server.
Usually, when you try to play, RTMP publishes directly which is RTMP playback, you should expect somewhere around 3-second latency but with WebRTC playback, much lower levels of latency are achievable with Ant Media Server.
How to use XSplit?
Let’s see how to use XSplit for streaming step by step guide;
1. Install the XSplit
Download XSplit from xsplit.com and Install it. It is only available in Windows 7 or newer and is currently not supported either in Linux or Mac Os.
2. Provide Sources
When you open the XSplit, it will ask for the canvas option for different purposes. They are easy to manipulate with drag and drop. Also, you can do much more than the default presets that are provided by XSplit itself by adding keybinds to change scenes and add custom scenes according to your needs.
It has some useful features for streaming, for further information you can google about XSplit tutorial or you can use XSplits’ official manual about the software here. So in that way, you will be able to master how to use XSplit and will be one step closer to RTMP to WebRTC stream.
3. Configure XSplit
We’re assuming that your Ant Media Server accepts all streams. (There are no security options enabled.)
- Click
Broadcastin the XSplit Window and then click ‘Set up a new output’ - Choose
Custom RTMPin theSet up a new outputdropdown menu. - You can write any name and description you want.
- In the RTMP URL box, type your RTMP URL without stream id. It’s like
rtmp://your_server_domain_name/LiveAppPS: Your 1935 port should be open and your server should be reachable.- If the 1935 server is not reachable, XSplit won’t be able to send the stream to the Ant Media Server.
- In the Stream key, you can write any stream id because we assume that no security option is enabled.
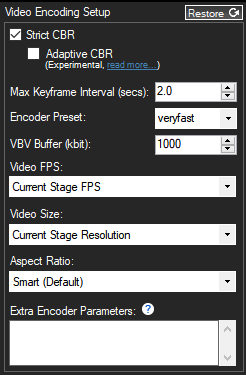
- You can click on the gear icon to access the advanced settings of the encoder. There is FPS selection and resolution selection but everything else is for advanced users and we usually don’t recommend tinkering since it can ruin your stream experience.
- If you think something is wrong with the stream, It is good to restore settings to default and follow the guide again to ensure everything is as it should be.
- You can change your Codec to GPU codecs like NVENC, QuickSync, or Video Code Engine or use x264 which is CPU encoding.
- You can change your bitrate according to your needs. As mentioned above, you can find resolution and fps selections in the encoder settings which can be accessed via the gear icon.
- When you click on the gear icon, if x264 is selected, you will see such options.
- You can change your preset to medium for better image quality when there is motion.
When you’re using tokens you need to generate a publish token and use it in this format inside the stream key : streamdid?token=tokenid
4. Start Streaming
Close Settings window and just click the “Stream” button in the main window of XSplit. It will start streaming. You can play it on the server as shown below;
And you are publishing with vMix! You can watch your low latency WebRTC stream in https://your_server_domain_name/LiveApp/play.html?id=stream_key
We tried to explain how to use XSplit and we hope this tutorial helped you to get online with XSplit.
You have more options for publishing in RTMP. Please check our other guides for publishing in RTMP:
If you have any questions, don’t hesitate to contact us.


